Edit a form
This page shows you how to change an existing contact form, and what your changes do to submissions you've already received.
Members with the Manage Contact Forms permission. See Manage form access.
Open the editor
- Go to Widgets > Forms.
- On the form, click the edit button. The Edit form page opens.
The page has 4 sections: Form, AI evaluation, Lead pipeline and Email templates. Changes to Form and AI evaluation are only saved when you click Save at the top. Changes to Lead pipeline and Email templates save as you make them. Above the sections, the Active switch, the Notification email and Notifications by bucket each save on their own.
Turn a form on or off
The Active switch at the top of the Edit form page decides whether the form takes submissions. It saves as soon as you change it, and you see "Form activated." or "Form deactivated."
- Inactive forms stop accepting submissions. The form's link shows a page that isn't found, and visitors who already have the form open see "This form is no longer accepting submissions." when they submit.
- Nothing is deleted. The form keeps its settings and all its submissions, and it's marked Inactive on the Forms page.
- Plan limits count active forms only. If you're at your plan's limit, turning a form on fails with "You've reached your plan's limit of contact forms. Deactivate one or upgrade your plan to add another." Turn another form off first, or change your plan. See Usage and limits.
If your organization moves to a plan with a lower limit, Bizbot keeps your oldest active forms and turns off the newest ones beyond the limit. Each one is recorded in the action log. See Action log.
Set the notification email
Each form has its own Notification email: the address Bizbot emails when a new submission comes in. Use it to send each form's leads to the right people, for example sales leads to your sales inbox and support requests to your support inbox.
- On the Edit form page, find Notification email, under the Active switch.
- Enter the address, for example
sales@example.com. - Click the Save button next to it. You see "Notification email saved."
This Save only saves the address. It doesn't save other changes on the page, and it doesn't rebuild the AI scoring guide.
- New forms start with no address, so they send no notification emails until you set one.
- One address per form. To reach several people, use a shared inbox or a distribution list.
- To stop the emails, clear the field and click Save. You see "Notification email removed." Submissions still arrive on the Forms page as usual.
- The address is checked. An address that isn't valid shows "Enter a valid email address." and can't be saved. Bizbot stores it in lowercase.
- Changes are recorded in the action log as an update to the form. See Action log.
Notification emails are included in the Business and Enterprise plans. On the Free plan, no notification email is sent even when an address is set. The address is kept, and emails start once your plan includes them. See Plan limits.
For what the email contains, see Review submissions.
Choose which leads notify you
Bizbot sorts every submission into one of two buckets by its AI score:
- Inbox: a score of 50 or more, or no score at all. Submissions without a score, for example on the Free plan, always go to Inbox.
- Junk: a score below 50.
Each form decides which buckets notify you, so you can stop low-scoring leads from filling your inbox without losing them. A bucket that notifies you:
- emails the form's notification email when a new submission arrives, and
- counts its unread submissions in the badges on Widgets > Forms, on the Forms page and on the dashboard.
To change it:
- On the Edit form page, find Notifications by bucket, under Notification email.
- Turn Inbox or Junk on or off. The change saves straight away, and you see "Junk leads won't notify you." or "Junk leads will notify you." (or the same for Inbox).
- Both buckets notify by default, on new forms and on forms you already have.
- Turning a bucket off doesn't hide anything. Its submissions still arrive and show under their tab, and they still look unread in the submissions list until someone opens them. They just don't send an email or add to the badges. See Inbox and Junk.
- It applies straight away to the badges. Turning Junk off removes its unread submissions from the badges at once, and turning it back on brings them back. Submissions that arrived while it was off aren't emailed later.
- Without a notification email, only the badges change. The card says "No notification email is set, so these switches only affect unread badges."
- Changes are recorded in the action log as an update to the form. See Action log.
Buckets depend on AI scoring, which is included in the Business and Enterprise plans. On the Free plan the card shows an upgrade note and "Without AI scoring, every lead goes to Inbox." Submissions scored before a downgrade keep their bucket. See Plan features.
Form
Form holds what visitors see.
- Title: the heading at the top of the form.
- URL: the last part of the form's link, after
/contact/. - Fields: the questions visitors answer. Add them with Add field, and set each one's Field name, type and Required option. Remove a field with its remove button, and reorder fields by dragging or with the arrows. See Create a contact form for the field types.
Changing the URL changes the form's link. Links and embeds that use the old URL stop working, so update them everywhere you've shared the form.
Click Save to apply your changes. You see "Form saved."
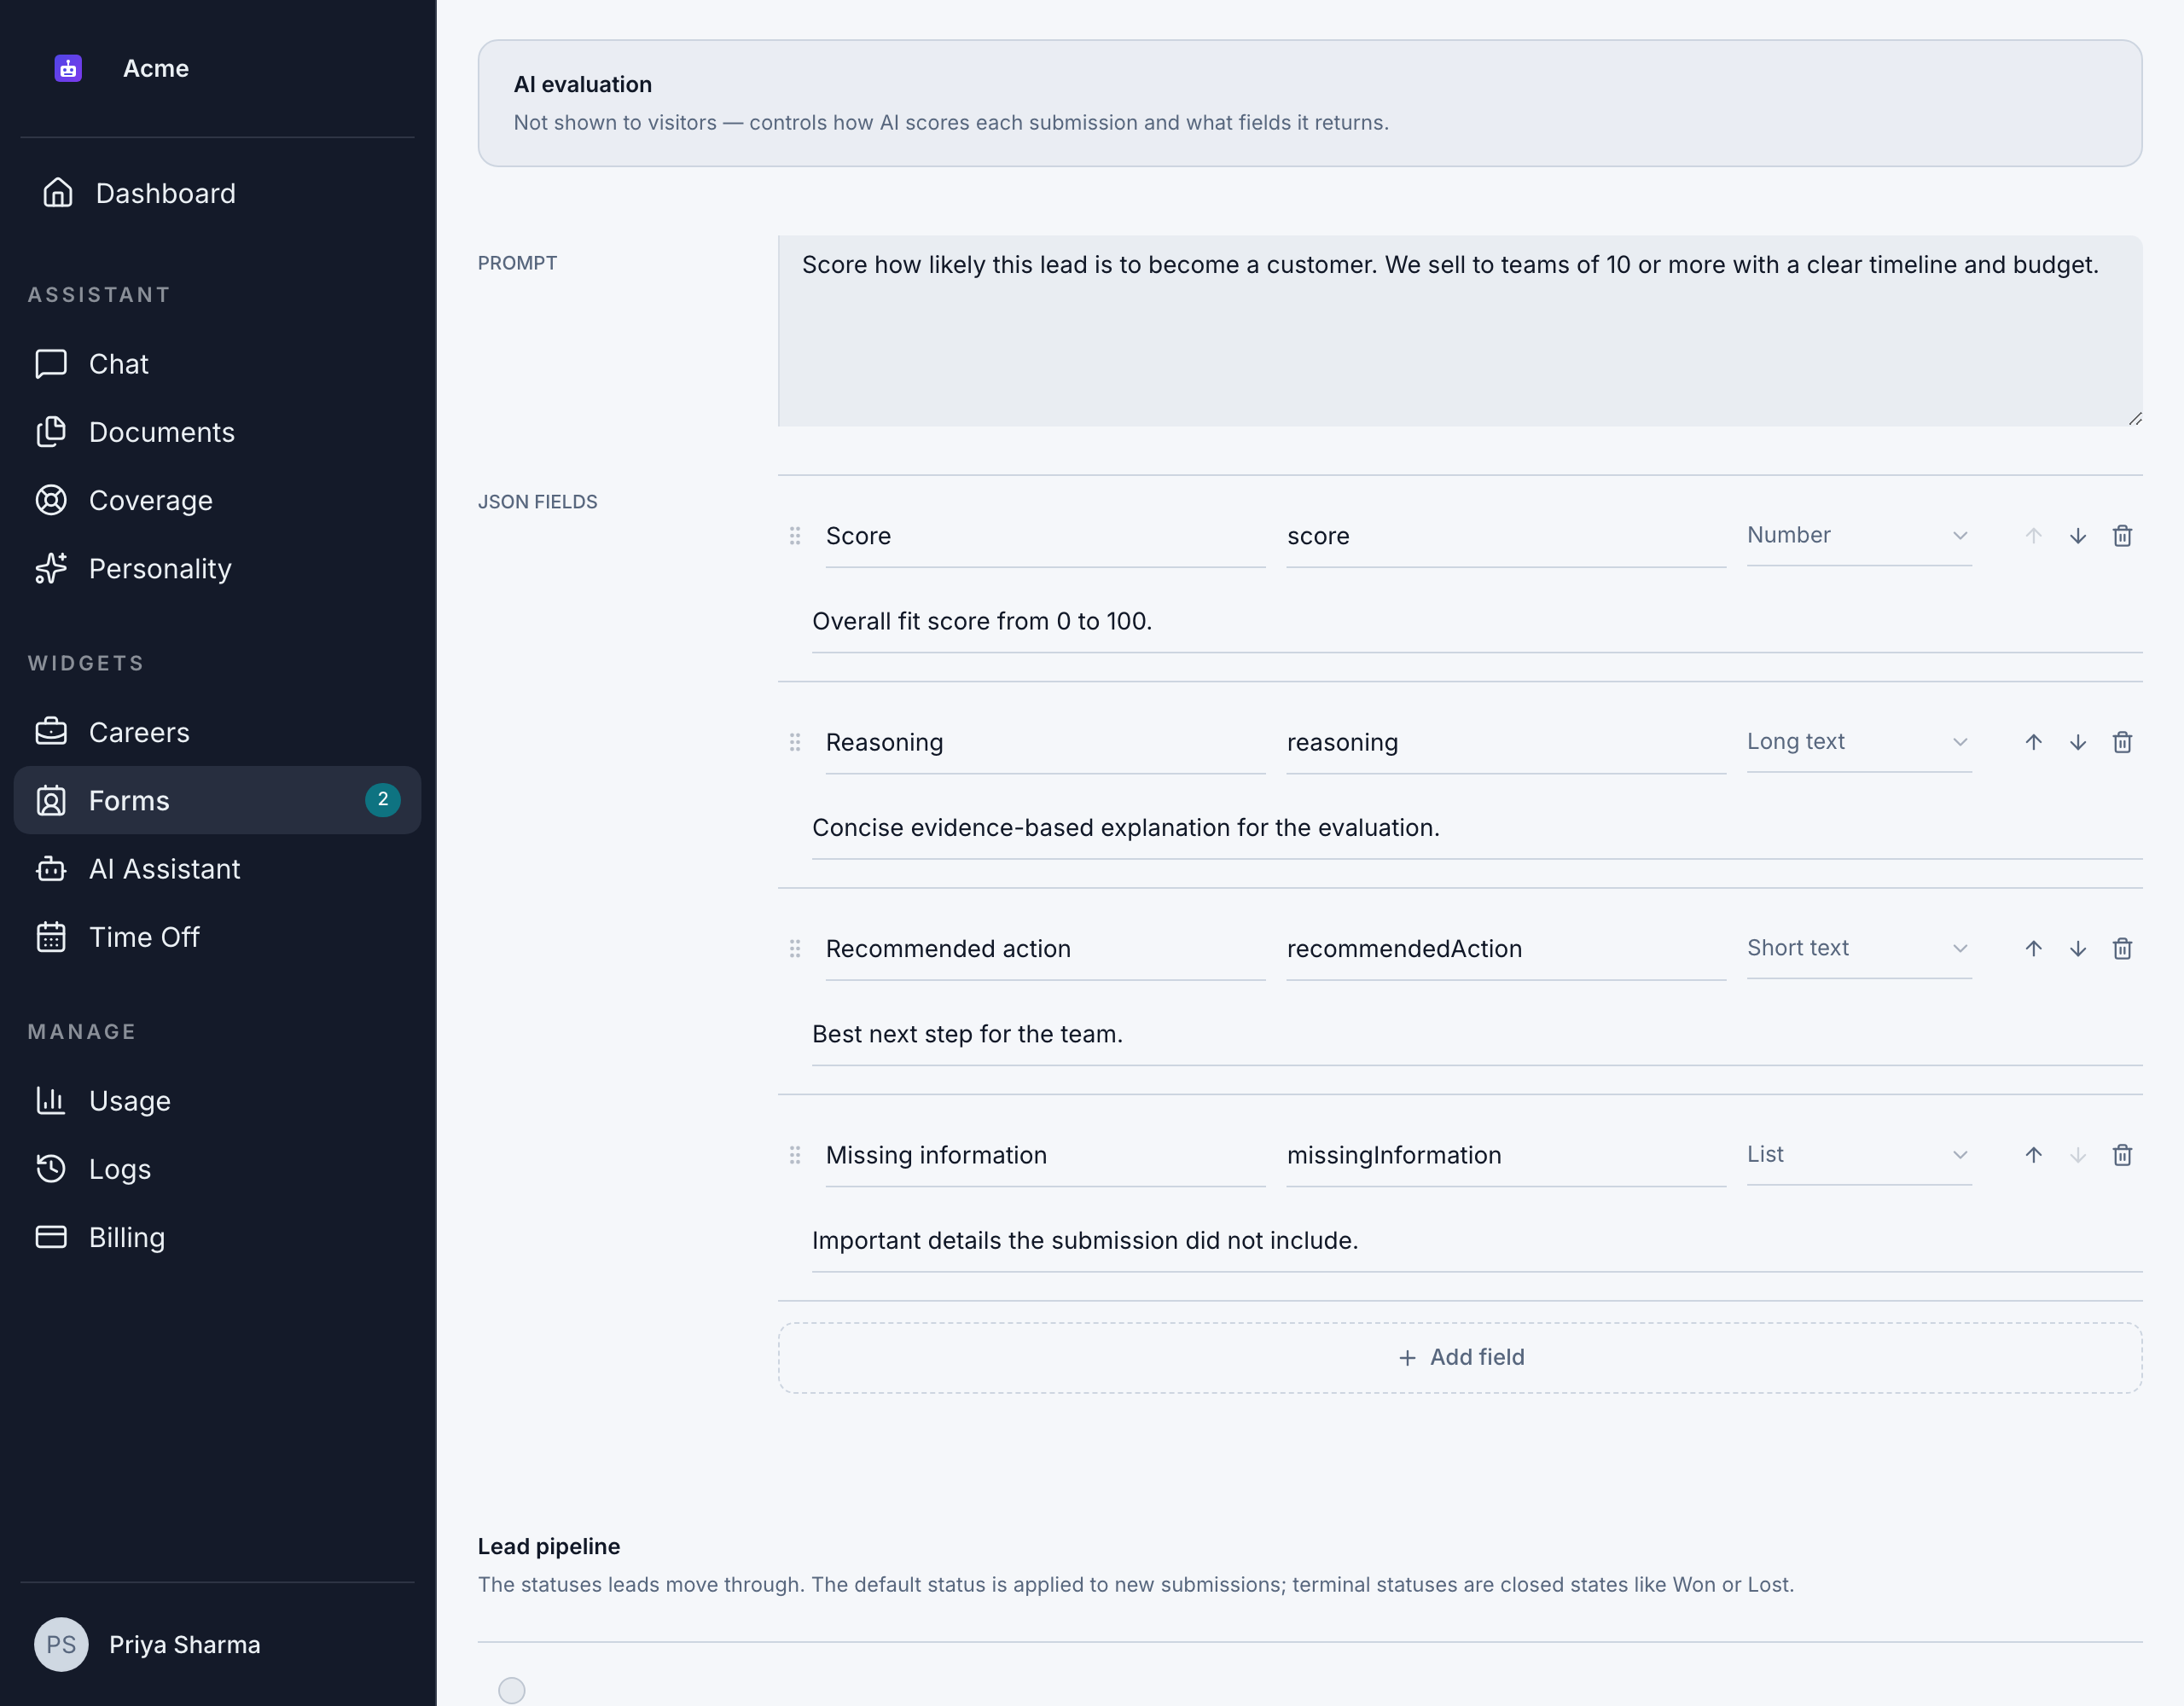
AI evaluation
AI evaluation controls how the AI scores each submission. Visitors don't see it.
- Prompt: what makes a strong submission for you. Be specific about what matters, such as company size, budget or urgency.
- JSON Fields: the results the AI returns for each submission. The first field is always Score, a number from 0 to 100. It's locked: you can't rename, change, move or remove it, because its score decides whether a submission goes to Inbox or Junk (see Choose which leads notify you). For every other field, set:
- Display label: the name shown on the submission, such as "Budget".
- JSON key: an internal name. Bizbot fills it in from the label.
- JSON value type: Short text, Long text, Number, Yes / No, List or JSON object.
- AI field instruction: what the AI should put in the field, such as "The budget the visitor mentions, or 0 if none."
Click Save. Bizbot rebuilds the form's scoring guide from your prompt, fields and results. If that fails, the form is saved with a basic guide and you see "The AI evaluation guide couldn't be generated, so a basic one is in use. Save again later to retry."
AI scoring is included in the Business and Enterprise plans. On the Free plan, this section shows "AI lead and applicant scoring is included in the Business plan. Upgrade to use it." instead, submissions arrive without an AI evaluation, and the form still saves. See Plan features.
Lead pipeline
Lead pipeline holds the lead statuses that submissions move through. The pipeline is shared by every form in your organization. Every organization starts with New (the default), Contacted, Qualified, Proposal, Won and Lost.
Changing the pipeline is included in the Business and Enterprise plans. On the Free plan the pipeline is read-only, but you can still move submissions between these statuses.
- Add a status: type a name in New status name and click Add status.
- Rename a status or change its color: edit its label, or choose a color.
- Set the default: choose Default on the status that new submissions should start with. Only 1 status can be the default.
- Mark closed statuses: turn on Terminal for statuses that end a lead, such as Won or Lost. Open Leads in the submissions list hides leads with a terminal status.
- Reorder: use the up and down arrows.
- Delete a status: click its delete button. Bizbot tells you how many leads have that status and moves them to the default status.
Email templates
Email templates are ready-made emails you can use when following up on a submission. They're shared by every form in your organization. They're included in the Business and Enterprise plans: on the Free plan, existing templates are listed but you can't add, edit or delete them.
-
Click Add template.
-
Enter a Name, Subject and Body.
-
Add placeholders to personalize the email. They're replaced with the submission's details when you use the template:
Placeholder Replaced with {{first_name}}The submitter's first name {{full_name}}The submitter's full name {{email}}The submitter's email address {{form_title}}The title of the form {{organization_name}}Your organization's name {{sender_name}}The name of the person sending the email {{field:Some Field}}Any submission field, by its field name -
Check the preview, which fills in sample details.
-
Click Save template.
Turn off Active to hide a template from the list when following up. Inactive templates stay in the history of submissions that used them. There's no test send: to check a template, use it on a test submission and send the email to yourself. See Review submissions.
Good to know
- Old submissions aren't rescored. Each submission is scored once, when it arrives, with the scoring guide in use at that time. Changing the prompt or JSON fields only affects new submissions.
- Old answers stay as they were. Adding, renaming or removing fields doesn't change submissions you've already received.
- Evaluation labels follow the current settings. Old submissions show their saved results with your current Display label names.
- Style isn't set here. To match your website's look, use Generate theme on the Forms page. See Share a public form.
- Pause a form instead of deleting it. Turn off Active to stop new submissions and keep the old ones. Deleting a form also deletes all its submissions. See Manage form access.